Tuesday 10 November 2015

shop update and thank you discount voucher...


hi, I'm not sure if there is anybody still reading blogs these days but I am going to keep posting here with shop updates and tutorials just in case. I have been busy with my digital printed fabric, I am so happy with how they turned out and have made up some cushions and a patchwork using them. they are now listed in my etsy shop
As a little thank you for those who still pop by, here is a voucher code for 20% discount, just type TEAWAGON20 at the checkout to get your money off. (Valid until 20th November) There are lots of new prints, postcards and some one of a kind christmas stockings so you could do a spot of early christmas shopping :) 
I'm working on a few book commissions again but when they are finished I will be thinking up some festive how to's to share in december. x x thanks for reading x x

Tuesday 20 October 2015

Patchwork panels...


a while ago I was working on some fabric designs, at the same time I was also making up some vintage patchwork quilts. The vintage fabrics were lovely but my supply was running out. So I thought about designing some fabrics I could use in the patchworks...

the large flower print in the background is also available
  then that idea developed further into a patchwork panel design... how very '70s and retro I thought.
so I designed a panel based on my quilts below.


The panel is printed with different squares of retro inspired patterns which look like a vintage patchwork you can simply sew it up with wadding and backing and make a super quick quilt or you could use it for cushions or bags, anything you like really. 


the panel is printed by a UK company called Woven Monkey and they will print any design digitally onto a selection of different fabrics...they also have an option to set up an account so others can buy your designs too.

I had a think about how to make this work so the panels would be available for you to buy and make your own quilts and this seemed like the best way.
To buy the patchwork panel you can visit the shop here and choose the design you want, then pick the size (sample/FQ/or metre) For this quilt I ordered a metre of (Pop Patchwork) onto 100% cotton. ** Please note the layout may look distorted until you click on the metre size then it will look as it will be printed** Printing takes around 7-10 days. 
One panel makes a quilt approx 100cm x 145cm and all you need to do is add the backing, binding and wadding. To make it look more realistic I top stitched along the squares. It took me less than three hours to make up this quilt. 
I realise this fabric is not for the true quilters amongst us, but thought it was a good way to offer up all the designs on one panel and would be ideal for beginners. Also it does work out cheaper than buying all those different fabrics.
I will be adding more designs to the site too, so keep checking back.

* If you are wondering where the comment box has gone I have de-activated it because I wasn't able to check often enough and it was full of holiday home spam...if you want to get in touch you can message me on FB//Etsy or instagram as I check there regularly, sorry for the inconvenience :) thanks for reading x x

Monday 14 September 2015

what's going on?...


over at littleteawagon?? A quick update on the new look shop....during the summer I was very busy working on new prints and new designs for a little relaunch of my business.. a few people have asked me why I don't sell vintage fabric anymore. The simple answer is I don't really have enough left., when I first started out my work was kind of defined by the fabrics I found, at first buying them was easy and I had a lot (and I mean a LOT) but as time went on my customers began asking if I could sell some of the fabrics I used, which I did and so the fabric cupboard slowly emptied.(I have saved a few of my favourite ones which...when I can bear to will be bundled up for sale too) In the last couple of years it has become so difficult to source any decent ones that I decided to concentrate on my other passion - Graphics.
I always knew that littleteawagon would have to evolve to keep going and that styles and tastes change over time and that's a good thing I think...So, the new prints are listed now and also a new range including digital download printables. I've tried to cover different age ranges, genders and interests but if you have any suggestions please let me know. I've also have been working on a range of greeting cards and some fabric designs which will be used in new home wares, lots more ideas are in the pipeline as well so pop back if you can.
link to shop in sidebar x
thanks for reading x
Jane 

Wednesday 12 August 2015

spoon dolls...


hello..I'm back again with another little how to..although it's not really a how to because every one knows how to paint a wooden spoon right?

it's more of a here's what you could do with a wooden spoon type of post...hopefully just a bit of inspiration.
 

my spoons came from the kids craft section of a supermarket so have little handles but any kind will work, new ones are good but used ones are ok too in fact sometimes the darker wood looks better.
 
I used acrylic paints but poster paints would work too, try to avoid felt tips or pens because they bleed into the grain (even if you paint the spoons first I find they still do) I discovered this when I was making these
Also if you are a bit wobbly with a brush (like me) a wooden cocktail stick works well for painting on small details like eyes etc...


don't worry if you make a mistake...the eyes went very wrong here!! but no problem, I'll show you what I did about that in a bit.

masking tape is always handy for a bit of extra colour.

And remember the one with the bad eyes...well she ended up a masked super hero so I gave her a cape :)


I added a bit of tape to the lower part of the handle and sprayed them with some clear varnish...just so the colours stayed nice and bright.

they are going to keep me company by my desk...
bye for now x x

Monday 3 August 2015

Peg board tutorial...


 hello... no blog posts for a while, sorry.  I made a decision not just to blog for the sake of it and when it has been 5 years you do run out of things to say...but I wanted to keep the option of posting the occasional tutorial here if I made anything useful. So here I am.
This came about because I needed something to hang my prints on when taking photographs of them for my etsy shop. But they turned out so well I have used them as storage for my shed and little desk area.  Last year I made one for my book which is in a vintage frame and more decorative but this one is so simple.
You will need
Wooden peg board sheet (cut to your required size)
1 length of wooden dowel (the size of the peg board holes) mine was 4mm
White emulsion paint
Paint roller/ tray or brush
Small wood saw
Sandpaper
Acryilic paint in a few different colours / paintbrush
Small screws/ screwdriver
Re the wooden peg board: you can find this in timber merchants and diy stores and they will usually cut it to size for you, however they may charge you for the whole piece even if you you don't use it all so I had mine cut into 4 pieces that would easily fit in the car and I have spares to make extra boards for Mr H's shed and the kitchen. My 4 pieces cost approx £15


ok so it will look like this (unless you are lucky enough to find white pegboard, in which case skip the painting bit!)
using the emulsion paint and roller paint the pegboard white, try not to over load the roller as this clogs up the holes...


if the holes do get paint in them don't worry let it dry a little and then use a piece of the dowel to push into the holes to clear them.


while the paint is drying cut the dowel into 6cm length pieces, (I got approx 30 out of my dowel piece)...smooth the ends with the sandpaper and then paint one end in your bright coloured paint.


When all the paint is dry push the dowels into the pegboard, make sure they go right in so you will be able to hang things on them securely, they will be a snug fit but that's good as it keeps them in place.


To attach to the wall just use a small screw at each corner and fix in place.
You could paint the pegboard any colour to match your scheme or leave it unpainted.You can also find lots of different fixings online like baskets, hooks, small shelves etc to make it really useful..they are usually in garage storage or workshop sections.
Note added ...if you want to hang heavier items on these pegs they might not be strong enough so you would be better with metal hardware like the ones they use in shops :)

That's it for now, thanks for reading x x

Thursday 7 May 2015

hello sunshine!


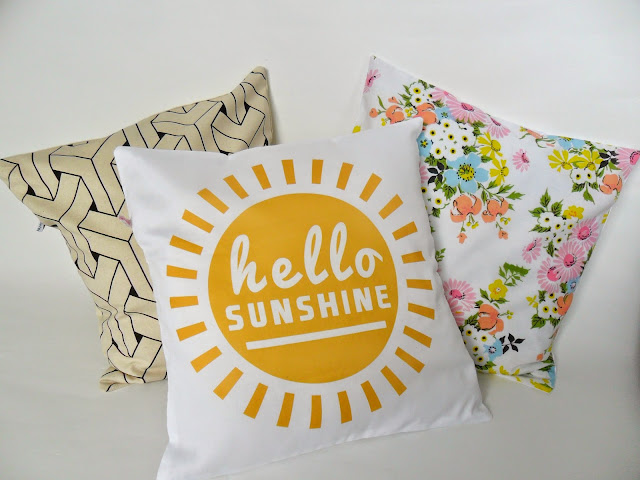
some new cushions have arrived in the shop  they had been cut out and sat on my work table for too long so I got in my shed and stitched them up. The vintage nine patch is back, along with a lovely geometric print and my favourite vintage sheet pattern. Also my newly printed Hello Sunshine fabric.I'm planning on getting more printed panels worked up and also some repeat florals.
Hope you are having a lovely week  x x x

Monday 20 April 2015

spring break...


so the holidays are over but this sunny happy weather is hanging around for a bit longer hopefully. This is what our Easter looked like...

our easter tree was a twig with origami birds, I confess I'm not taking this down anytime soon as I've grown very fond of it...
 

 sunny days and outdoor crafting are my favourite, this door wreath was so quick and easy to make....


 in the second week of the holidays we tripped off to a little log cabin in North Yorkshire for a few days... no internet or phone signal so we had a chance to unplug for a few days...it was much needed.


I took a book, some wool and my quilt (which I take everywhere just so I feel a bit at home) and we walked and walked, saw waterfalls and castles, museums and rock pools, we took boat trips, had fish and chips on the beach and soaked up the sunny bright days.


and of course we couldn't resist a trip to Whitby and Robin Hoods Bay...

 and my wool slowly turned into this... now I have more than enough blankets these days so this one was for...


Arnie x

I hope you had a good Easter break...I'll be back soon with some new makes x